Archive for category Uncategorized
Event id 59
Posted by amctc in Uncategorized on July 30, 2014
Disk x will not be used because it is a redundant path for disk y
Event ID: 59
Disk 7 will not be used because it is a redundant path for disk 2
The above warning comes when there is a problem with the multipathing software or problem in storage level zoning.
Windows can detect if a lun has multipule path, sytem activly uses the first path and keeps the other path for redundancy. Incase if there is a problem with multipathing software or miconfiguration in zoning, we may see two disk of same size in diskmgmt.msc.
We need to check if both x and y disks are of same size on diskmgmt.msc and the status of both the disk.
Acction Plan
1. Zoning configuration need to be checked and rectified.
2. Multipathing software need to be reinstalled.
Remote desktop slow login- fix
Posted by amctc in Uncategorized on July 25, 2014
The below registry settings can be used to ignore the user logon related errors which cause delay in login process. This can be used as a workaround to fix delay user login issues.
Take backup of your registry before doing any changes.
1. Click Start, click Run, type regedit in the Open box, and then click OK.
- Locate the following registry subkey:
HKEY_LOCAL_MACHINE\SYSTEM\CurrentControlSet\Control\Terminal Server
- Click Edit, point to New, and then click DWORD Value.
- In the New Value #1 box, type IgnoreRegUserConfigErrors, and then press ENTER.
- Right-click IgnoreRegUserConfigErrors, and then click Modify.
- In the Value data box, type 1, click Decimal, and then click OK.
- Exit Registry Editor.
Activate Windows through command if phone activation is disabled
Posted by amctc in Uncategorized on January 23, 2014
To Activate windows manually ( in case if the phone activation is disabled on the server) try the below steps.
1. On command prompt give the below command to see the system id.
slmgr.vbs –dti

2. Here on this screen pass Ctrl+ C to copy the text and paste it in a notepad file.
![]()
Please place gaps( space or -) in between every 6 digit ( it will be easy to read the blocks while entering the code on phone, 6 digit in one block)
3. Then call the Microsoft to activate the windows. (For UK – 8000188364 )
It will ask for the system Id, then provide the blocks obtained from the above steps one after other, once complete it will read back the confirmation id for you, make sure you note it down.
4. The confirmation id will be 8 blocks having 6 digits each. Note down each blocks on notepad.
And at last remove the “spaces” or “–“ if you have entered in between the blocks while writing it.
![]()
5. Now enter the below command to activate the window
Slmgr.vbs /atp above _confirmation_id
![]()
6. Check the system properties to see if it gets activated.
User profile cannot load due to insufficient system resources
Posted by amctc in Uncategorized on November 28, 2013
This article is documented on “http://support.microsoft.com/kb/935649”
When you try to log on to a Microsoft Windows Server 2003-based terminal server, you receive the following error message:
Detail: Insufficient system resources exist to complete the requested service.

The below events you will see on the server
Event ID 1505
Event Type: Error
Date: date
Time: time
Event ID: 1505
Source: Userenv
User: Example\Username
Computer: ServerName
Description: Windows cannot load the user’s profile but has logged you on with the default profile for the system.
DETAIL – Insufficient system resources exist to complete the requested service.
Event ID 1508
Event Type: Error
Date: date
Time: time
Event ID: 1508
Source: Userenv
User: NT AUTHORITY\SYSTEM
Computer: ServerName
Description: Windows was unable to load the registry. This is often caused by insufficient memory or insufficient security rights.
DETAIL – Insufficient system resources exist to complete the requested service. for C:\Documents and Settings\Username\ntuser.dat
In addition you may also see event id 333 on the system event log. (http://support.microsoft.com/kb/970054)
CAUSE
You experience this problem if many users are logged on to the terminal server.
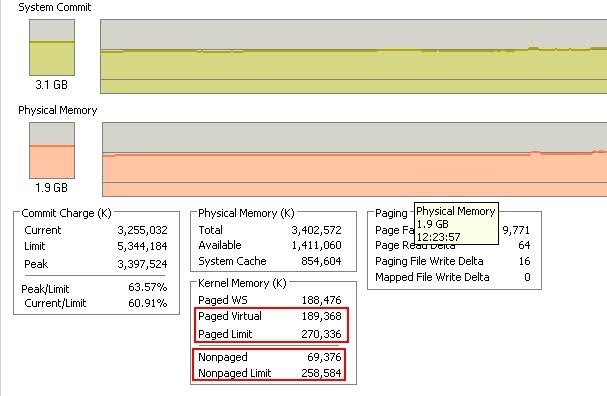
Basically this happens if the pagedpool is temporarily exhausted due to load or some other reason. It has been also noticed that the error stops automatically when user load reduces.
You can use Process Explorer to see the Pagedpool size and its current utilization. ( To see the Pagepool limit symbols need to be configured on for process explorer)
Monitor the server for few days and see the utilization, if it is always near to the limit then increase the page file limit and configure to trim processes when it reaches 60%. Perform below mentioned steps.
 Screenshot taken just after the issue fixed automatically
If it occurs frequently then the below steps can be followed
follow the steps: ( http://support.microsoft.com/kb/935649)
- Click Start, click Run, type regedit, and then click OK.
- Locate and then click the following registry subkey:
HKEY_LOCAL_MACHINE\SYSTEM\CurrentControlSet\Control\Session Manager\Memory Management
- On the Edit menu, point to New, and then click DWORD Value.
- In the New Value #1 box, type PoolUsageMaximum, and then press ENTER.
- Right-click PoolUsageMaximum, and then click Modify.
- In the Value data box, type 60, click Decimal, and then click OK.
- If the PagedPoolSize registry entry exists, go to step 8. If the PagedPoolSize registry entry does not exist, create it. To do this, follow these steps:
- On the Edit menu, point to New, and then click DWORD Value.
- In the New Value #1 box, type PagedPoolSize, and then press ENTER.
- Right-click PagedPoolSize, and then click Modify.
- In the Value data box, type ffffffff, and then click OK.
- Exit Registry Editor, and then restart the computer.
Ifconfig command is not included in ESXi 5.0
Posted by amctc in Uncategorized on November 28, 2013
Linux commands for retrieving networking information are not included in the ESXi Shell. You can instead use ESXCLI commands.
On ESXi 5.0, ifconfig information is the information for the VMkernel NIC that attaches to the Management Network port group. You can retrieve that information by using ESXCLI commands.
Also these commands will work on SSH console (Putty)
esxcli network ip interface list
esxcli network ip interface ipv4 get -n vmk<X>
esxcli network ip interface ipv6 get -n vmk<X>
esxcli network ip interface ipv6 address list
You can retrieve information about DNS with the esxcli network ip dns command in the following two namespaces:
esxcli network ip dns search
esxcli network ip dns server
For information corresponding to the Linux netstat command, use the following ESXCLI command.
esxcli network ip connection list
Configuring complete memory dump for NMI crash
Posted by amctc in Uncategorized on June 27, 2012
HKEY_LOCAL_MACHINE\SYSTEM\CurrentControlSet\Control\CrashControl
b) Right-click CrashControl, point to New, and then click DWORD Value.
c) Type NMICrashDump, and then press ENTER.
d) Right-click NMICrashDump, and then click Modify.
e) In the Value data box, type 1, and then click OK.
How much RAM your video card is using?
Posted by amctc in Uncategorized on March 26, 2012
How much RAM your video card is using?
Under Windows 7 if you see your PC is not actually using the amount of RAM you have installed on it then first thing you should check how much RAM is allocated to the video card.

To check the amount of RAM allocated for Video card
- Go to Control Panel ->Appearance and Personalization -> Display
- Click on change display settings

3. Click on Advance Settings

4. Here you can find the amount of Ram dedicated for the video card

Shared System Memory is the amount of system RAM which is configured to use for video card. Dedicated video memory is the memory present on the display card (inbiult chip).
As per requirement Shared System Memory can be reconfigured through system BIOS to fine tune the performance.
